Wednesday, October 12, 2011

Rescued Desk {tutorial}

Last spring I was on the hunt for a dresser to refinish for one of our spare bedrooms. I have yet to find a dresser I want to refinish, and have actually given up my hunt for now. However, one day on craigslist I found a dresser I thought would be worth looking at. Based on the add they seemed fairly close to where we live. So my husband gladly took me to look at the dresser.

It turned out they lived like an hour away, in the middle of nowhere and the dresser was a bust. They did have a desk that I offered her $20 for.  I didn't really need a desk, but I wanted more experience refinishing furniture. Plus, there was no way I was going to make my Husband drive me that far and leave empty handed. We rescued a desk to refinish.


I like how the desk turned out, but this project was a little questionable at first.


The desk had like 4-5 different layers of paint that were all chipping at different layers.  I needed to strip all the layers away to have a smooth surface to paint on. After attempting to strip the paint, which took forever, I decided to use an orbital sander instead to remove all the layers of paint. Here is how I refinished my desk:

Supplies:
Orbital sander with medium and fine sandpaper
Sandpaper block/cube
Steel wool for a fine finish
Kiltz spray primer
Foam roller
Paint of your choosing
Minewax finishing wax
Mask and protective eye wear

Use medium sandpaper first with your orbital sander to remove all the layers of paint (If you have a piece of furniture that already has a smooth surface and you are going to repaint but not stain the wood; then all you need to do is remove the "shine" off the paint). Once all your paint is removed then use fine sandpaper to give yourself a smooth finish. You will want to wear your mask and protective eye wear during these steps because there is so much dust.

Gently rub the surface with steel wool and spray the entire wood surface you will be painting with primer. I like to use spray primer because it goes on quickly and also dries quickly. Once your primer is dry, rub your surface with steel wool again. By "roughing-up" your surface a little bit  it will allow your paint to adhere better and prevent peeling or chipping later.

I used a quart size of Behr paint that I had color matched from an old paint chip. I am not sure what the actual color is, but I used an eggshell finish. I don't really like my refinished furniture to be a high gloss.

Start painting your furniture. I like to use a foam roller because I have pretty poor painting skills and a foam roller gives you a smooth surface. I have also found that it is best to paint your edges with a paint brush then use the foam roller on your main surface. Allow each layer to dry before moving onto the next and rub your surface with steel wool in between each paint layer. I did four thin layers of paint.

Next, I distressed the corners and high traffic areas of the wood using a sand paper block. I use to be anxious about distressing my beautiful new paint job, but you really can't mess this step up: it's all a personal preference to distress as much  or as little as you want. One last time, use your steel wool on your surface then cover with minewax finishing wax. All you do is rub the wax on with an old shirt, wait 10 minutes and rub the wax off.

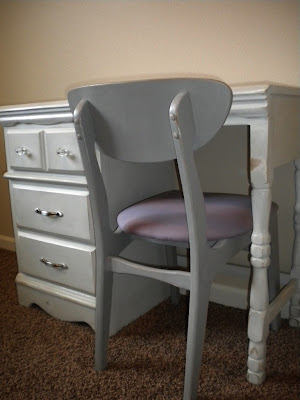
Last, I added my new hardware from the Home Depot.


Right now the desk is sitting in one of our spare bedrooms. My spare bedrooms have very little decor. I don't really want to spend the money to decorate rooms that I only use to fold my laundry. Plus, all our family lives within 30 minutes of us so we rarely have overnight guests. Someday, I will incorporate the desk into the decor of the room.


I also refinished this chair. I got it at a garage sale this summer for one whole dollar! It was originally dark wood with a black pleather seat cushion!


I will be linking up to parties at:
Check out all the Buttons here
Tutorials and Tips Tuesday at Home Stories A 2 Z
Flaunt it Friday at Chic on a Shoe String
Friday Flair at Whipper Berry
Potpourri Party at 2805
Sunday Showcase Party at Under the Table and Dreaming
Sunday Scoop at I heart Nap Time
Lovely Crafty Weekend at Lovely Crafty Home
Weekend Wrap up Party at Tater tots and Jello
Saturday Nite Special at Funky Junk Interiors
Show and Share at Southern Lovely
Wow me Wednesdays at Ginger Snap Scrafts
Sizzle into Summers at DIY by Design
Primp your Stuff Wednesday at Primp
Will Craft for...Comments at Tales of a Trophy Wife
Creative juice Thursday at Momnivores-dilemma
Share Awesomeness Thursdays at The 36th Ave
Flaunt it Friday at Chic on a Shoestring
Frugal Fridy at The Shabby Nest
Watch Got Weekend at Lolly Jane Boutique
Show and Share at Just a Girl Blog
Creative Bloggers Party & Hop at Homemaker on a Dime
Simple Creations Friday at My Simple Home Life


Friday, October 7, 2011

Boo! Eek! {tutorial}

This project was completely free... everything I needed I had around the house from previous projects.

A quick and easy project to spruce up your mantel for Halloween.

Supplies:
-2x4 (left over from a previous project)
-chalkboard spray paint
-chalk
-An awesome hubby who will cut your 2x4. (Or do it yourself, but mine thought I might lose a finger using a saw myself)

Cut a straight edge on both ends of your 2x4. Section off six blocks (or however many blocks you want). I wanted my blocks to all be different sizes to add some dimension to such a simple project. Once your blocks are cut, just spray paint them with your chalkboard paint. I did two coats on each side.

Originally I was going to use an old stencil to write the letters, but I decided I wanted to free hand them. Once your blocks are dry, write whatever your crafty mind chooses!


Check out all the Buttons here
Tutorials and Tips Tuesday at Home Stories A 2 Z
Flaunt it Friday at Chic on a Shoe String
Friday Flair at Whipper Berry
Potpourri Party at 2805
Sunday Showcase Party at Under the Table and Dreaming
Sunday Scoop at I heart Nap Time
Lovely Crafty Weekend at Lovely Crafty Home
Weekend Wrap up Party at Tater tots and Jello
Saturday Nite Special at Funky Junk Interiors
Show and Share at Southern Lovely
Wow me Wednesdays at Ginger Snap Scrafts
Sizzle into Summers at DIY by Design
Primp your Stuff Wednesday at Primp
Will Craft for...Comments at Tales of a Trophy Wife
Creative juice Thursday at Momnivores-dilemma
Share Awesomeness Thursdays at The 36th Ave
Flaunt it Friday at Chic on a Shoestring
Frugal Fridy at The Shabby Nest
Watch Got Weekend at Lolly Jane Boutique
Show and Share at Just a Girl Blog
Creative Bloggers Party & Hop at Homemaker on a Dime
Simple Creations Friday at My Simple Home Life


Thursday, October 6, 2011

Fall Comfort Food

Loaded Baked Potato Soup
In the fall and winter I love to make soups. I love that you can make a huge batch of soup at once and eat for a week, or freeze part of it to save for later. My husbands favorite soup is loaded baked potato soup. So, I have been on a quest to find a recipe that does not use tons of heavy cream. I found one via pinterest here. I changed the recipe some, to make it a little healthier.  The best part is, you can make it in your slow cooker!

Ingredients:
-1 head of cauliflower, washed and cut into pieces
-5 russet potatoes, washed but do not peel. Dice into about 1/2 inch cubes
-2 tablespoons minced garlic
-8 cups chicken stock
-2 8oz packages of fat free cream cheese
-1 tablespoon all purpose seasoning
-Cheese for garnish
-Crumbled bacon for garnish
-Chives

Directions:
-Add cauliflower, potatoes, garlic, and chicken stock to slow cooker.
-Cook on high for 6 hours or low for 10 hours
-In a blender place one of the packages of cream cheese and fill with soup. Do this with both packages of  cream cheese. Blending the cream cheese will help to integrate the cheese and soup. 
-You only want to blend about half your soup, the rest you can stir really well or use a potato masher. This way you still have a few larger chunks of potato in your soup
-Stir everything together, add garnish, and taste.


I forgot to buy chives at the store. Mine was chive-less but still delicious.

This will give you 10-12 servings. It seemed like I was eating soup for a week. You could cut this recipe in half or freeze the soup in individual servings and reheat for a quick delicious meal later.


Wednesday, October 5, 2011

WOW # 4

Workout of the week # 4
Pinned Image

It's that time of week again. It's time for the workout of the week. Yep, it's another circuit workout! I have some responses to past workouts that many ladies feel these workouts just seem too intense. I once said that too, and had no desire to do these workouts. Here is why I do circuit training:

I used to be the girl that went to the gym, jumped on the treadmill, ran a few miles, went to the weight room and walked around, (having no idea what to do) did a few crunches, and left the gym. I never saw any results. I finally started seeing some results when I started lifting weighs. I instantly started to slim down and burn more fat when I began weight lifting. I was soon introduced to cross-fit and circuit workouts. But I refused to do cross-fit because it seemed "too intense" and the females I saw doing cross-fit had way more muscle then I ever wanted to have.

It took me six months to give in and try cross-fit. I saw results when I started lifting weights but I saw major result when I started practicing cross-fit. I was finally toned. And no, I did not suddenly become super muscular. The hormone balance of a female body is not naturally meant to be muscular like a male. Your specific genetics play a role in how muscular you will become, but unless you are super supplementing with protein and creatine powders you will not bulk up. Here is a great article that explains all this, in more detail.

Here is our circuit for the WOW:

Run 1 mile to warm up
Stretch
Complete the following circuit 5 times:
  • 22 kettle ball swings
  • 22 box jumps (20 inch box)
  • 22 burpees
  • 22 wall balls
Cool down by walking a half mile and stretching.

Every body is different. This is the type of workout I have found works for my body to achieve the results I want to see. You may need to do something different for your body and what you want to achieve. Leave me comments, what have you found works for you? Or is there a type of workout you would like see in the next WOW?